
The choice of the operating mode is carried out using the SI pin, at a low level on SI, the sensor operates in SPI mode, at a high level – in
I2C mode. “Noise level so high” — when the noise level is high.
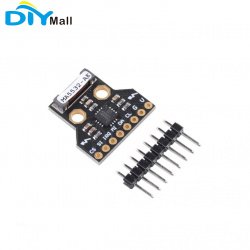
DIYmall AS3935 lightning sensor: how to "catch" lightning (or fool and lightning)
 I uploaded the sketch from the sparkfun library examples to the Arduino, I opened the port monitor and waited. Advanced settings example: This example demonstrates other features not mentioned in the basic code example.
The sensor has a built-in voltage regulator, which in this version of the board is always active, so the sensor can be powered from a 5 V voltage source, but there are modules where the stabilizer activation pin (EN_VREG) is brought out and can be controlled giving a high or low level respectively. When searching for information about this module, I came across reports that there are modules with incorrect capacitor ratings (1000pF and 100pF), in this case it will not work to programmatically calibrate the antenna. Using a sensitive RF receiver and a built-in patented algorithm, the AS3935 detects electrical emissions from lightning activity and then provides a distance estimate of 40 km to 1 km to the storm source, while eliminating interference from household appliances such as motors and microwave ovens.
The AS3935 can detect an approaching thunderstorm and provide a leading edge distance estimate, where the leading edge of the storm is defined as the minimum distance from the sensor to the nearest edge of the thunderstorm. Fine tuning can be done programmatically. I spent the whole evening looking out the window, then the monitor, and purely subjectively I can note the correlation of the distance to the lightning flash, calculated by the sensor, and observed by me. "I love a thunderstorm in early May, When the first thunder of spring, By default, the MISO and CS ports of the SPI bus are not active.
AS3935 Franklin Lightning Sensor™ is a lightning sensor with built-in distance estimation algorithm from AMS. There was no limit to the delight when, with each, even barely noticeable, flash in the sky, a new message appeared in the port monitor. After purchasing the sensor, I was itching to plug it in and test it. The AS3935 is the world’s first lightning detection IC designed for low power portable or stationary applications. I was upset and decided that I got a defective sensor, but still I was waiting for spring thunderstorms … Basic example with minimal settings: This example demonstrates how to detect lightning. 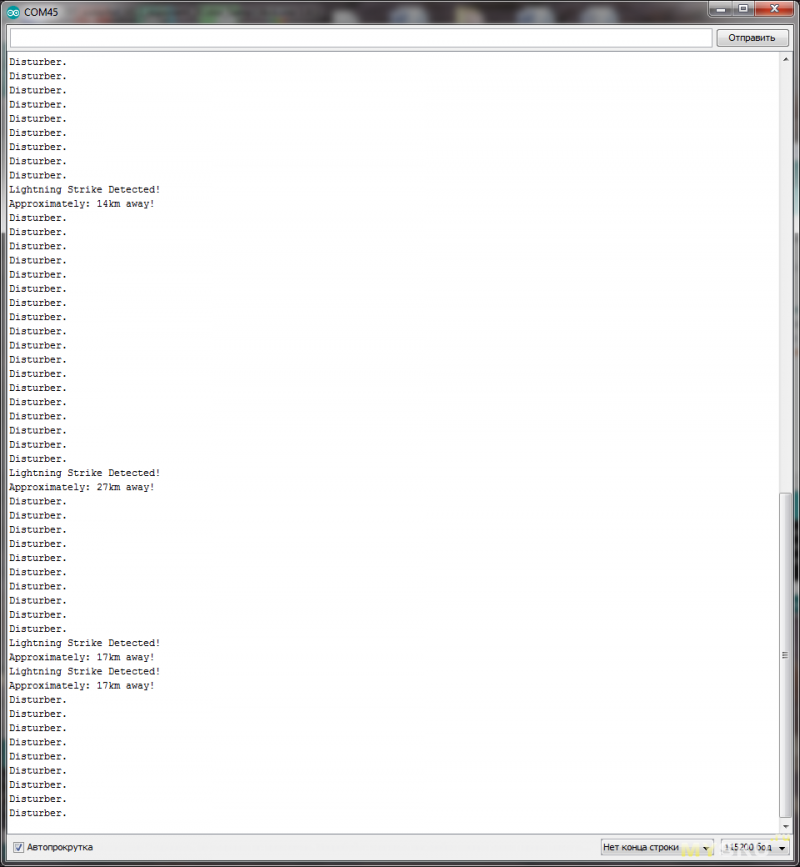 Surely for many, the approaching thunderstorm causes a primitive feeling of fear: it seems that there is no hiding or running away from this element. It includes various ways to reduce false events, turn off and wake up the sensor, as well as reset all settings to factory defaults. The example generates 3 types of messages: as if frolicking and playing, Capacitors connected in parallel to the antenna (680pF and 270pF) set the resonant reception frequency in the region of 500 kHz.
The size of the board with the sensor is 21*20 mm. There are several examples with the library: 2. 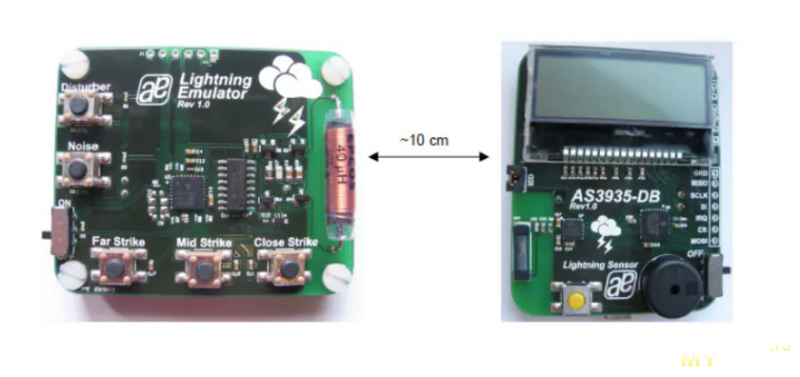 But, despite the feeling of fear, curiosity sometimes turns out to be stronger and you want to “touch” this destructive and, to some extent, mysterious phenomenon. The estimated distance displayed in the Distance Estimation Register is not the distance to a single lightning bolt, but the estimated distance to the leading edge of the storm. Rumbles in the blue sky." The AS3935’s built-in hardware distance estimation algorithm generates an interrupt on the IRQ pin every time lightning is detected.
I don’t have such a simulator and all attempts to use a piezo element from a lighter or a high-voltage converter from a stun gun were unsuccessful. I bought the sensor at the end of last summer and the thunderstorm season has already passed. Fyodor Tyutchev. “Lightning strike detected! Approximately: XX km away» — when a lightning strike is detected with an estimated distance to the thunder front; I tried different libraries, changed different sensitivity settings, but all to no avail. On the reverse side there are jumpers for activating the MISO and CS ports of the SPI bus and for setting the address when using I2C. Spring this year turned out to be dry and only at the end of May a thunderstorm suddenly broke out, but I was not ready and almost missed it. The manufacturer, along with the sensor, offers a lightning discharge simulator to test the sensor. 1. It has several basic settings to help suppress noise or "interfering" (false lightning).
Aliexpress has several options for the AS3935 sensor board, I honestly chose the cheapest option. This sensor costs several times more than common sensors, such as temperature and humidity, but this did not stop me and I am glad to share my impressions. Sparkfun has a page detailing how to get started with the sensor, where it is recommended to use the SPI interface, but the library also supports I2C. Also, the sensor did not detect any household electromagnetic noise. On the front side of the board are the sensor itself, the antenna and the sensor piping in the form of capacitors and resistors. And yet, at the end of the day, the sensor was connected to the first Arduino Nano that came across. The sensor detects cloud-to-cloud and cloud-to-ground discharges. This is familiar to me, so when I saw a lightning sensor for sale, of course, I hesitated for a while, but still bought it. “Distorber” (intruder) — subjectively, this message occurs during distant flashes;
There are many libraries for the Arduino IDE for the sensor, I used the library from Sparkfun. Unfortunately, by the night the storm was almost over and we managed to capture very few flashes of lightning.
The video shows the operation of the sensor a little more clearly.